Best Wooden Flooring If You Have Pets

dog-bite-little-girl-on-dogIf you have pets, then deciding on the proper flooring is a really significant part your interior planning procedure. While a lot of people suggest that hardwood floors is not perfect if you have four-legged friends in your house, there’s absolutely no reason why you shouldn’t have the ability to make hardwood flooring function for you and your pets alike. Here are our Top Three Strategies for Selecting the Most Appropriate floor for pets:

Invest in hardwood flooring, not softwood because your initial investment will pay off more term. Harder wearing than softwood, hardwood will stand up well to high traffic from the pets and people. Wood species like walnut, ipe or maple are perfect options.

Opt for solid timber, not designed wood. Because pets’ claws are likely to cause scratching to a floor, it is important to get the peace of mind of knowing you are sand your floor if you will need to. Solid hardwood floors will withstand more sanding into its life than engineered timber flooring.

Decide on a hardwearing finish on your flooring. If it comes to pets, the two oiled and lacquered finishes have their own advantages and disadvantages. Lacquered will show scratches more easily than oiled, but will endure to wear and tear. Oiled solid floors at a house that’s pets will likely have to be recoated more often than in a house that doesn’t have pets, but is very likely to seem less tired in-between occasions.

So, as Soon as You have made your choice of species of solid hardwood floors with a lacquered or oiled end, it is time to Check at everything else you can do in order keep your flooring looking good longer:

Long, scratchy claws may play havoc with hardwood flooring, particularly if your cat or dog is more prone to running about harshly! Because of this, it is important to attempt and maintain your pet’s claws nicely trimmed so that they do not damage your flooring.

Dry your pet whenever they are in by the wet. Contrary to (most) human beings, pets usually do not wash their feet before coming to the house, however many doormats you supply! As a result of this, it is really important to ensure to rub off your pet whenever they are in from out. Specifically, the combination of dirt, dirt and moisture is terrible news on your flooring, so do be sure you’re attentive in your attempts to dry your pet off before they come in your property.

Mop up any mishaps immediately. Although elderly pets are not as likely to have small mishaps, if they don’t happen, or when you’ve got a puppy or a kitty, do be certain that you spray any urine as fast as possible because urine may cause profound staining that could be tricky to eliminate.

HOW TO INSTALL HARDWOOD FLOORING

shutterstock_507214954There is no doubt that installing hardwood floors not only gives warmth, style and depth, but it is going to also add value to your house. Moreover, to get the most from your hardwood flooring, in regard to benefits and value, it is important to do it correctly.

Planning is Key
Fully preparing the region is essential, and you need to be certain that the surface is clean, smooth, level, dry and structurally sound. It’s likely to lay hardwood on existing floors if they are in good shape, in addition to concrete foundations or a new plywood sub base. Be sure to remove any doors and skirting’s, mouldings or flooring trims, and that means that you are able to put the flooring directly to the edge of the space, but leaving an expansion gap. It’s also a good idea to allow the wood adapt to your homes humidity and temperature before you start laying. You will also need a good quality underlay across the entire region, if you’re going to float the floor, with respect to nailing see laying the first row segment, that’s the same for floating and nailing, except you substitute paste for nails.

Ensure you measure the room accurately and establish where the floor joists run, as you want to lay your floor perpendicular to them, if you’re going to fix . Additionally establish the longest straight wall and use that as your guideline for floor alignment.

The Layout

Lay your floor in a staggered formation, if you do so with various lengths of wood. It’s also a nice design touch, to mix up different wood cuts for variation in wood color and grains.

Laying the First Board

Facing the tongue of their first plank in the wall, then dry-fit the very first board utilizing 1cm spacers between the plank and the wall and then nail it into the subfloor with a 50cm nail roughly 7cm in the conclusion, and each 300cm about the grooved border and keep fitting the rest of the first row as previously. In the second row onwards, you’ll need to use a tapping block to closely match the tongue and groove, then blind-nail through the tongue 7-10cm from the finish and each 30cm along the board, if you are laying solid floors, fixed to a timber substrate.

The Final Nudge

You might also stick smaller pieces with glue in tight corners. When you have the final pieces fitted it’s time to trim any exposed underlay, then re-attach your walls, moulds and doors, as well as transition strips between rooms and use wood filler to cover some nail holes. If your hardwood floor hasn’t already been sanded and varnished, you will need to do this before it is completed and allow lots of drying time.
Hardwood floors is a great way to create a wonderful finish and style to your home, so take our advice and you won’t go much wrong. Here at Only Wood, we have been working with hardwood floors for years and we are here to impart some of our experience and wisdom, so that if it comes to installing your hardwood flooring, it’s always done correctly.

A Brief History of Wood Flooring

It doesn’t matter what decorating design you’ve chosen for your home, you’ll be able to discover wood floors that combines seamlessly with your choices. For centuries, humans are using wood as a flooring for their homes. Have you ever thougd3f6b2c63daf93fadd94ca768694657b--wood-flooring-parquetryht about how timber flooring started?

In the Beginning

Since people first started to roam the Earth, we’ve been using wood to construct all sorts of items, from homes and buildings to fires to keep warm. Trees have always been a valuable all-natural resource. Sticks and bits of wood were used to create huts and shield. These shelters had dirt floors initially, and for many decades.

In the Middle Ages, people eventually figured out that they could use flat wooden planks as flooring. They also figured out using all the new wooden floors, they can build homes and buildings on more than one level. These boards were unfinished, but back then wood flooring has been pretty much a revelation.

Evolution

The boards for ancient wood flooring came from woods with lots of big, old trees. As a11150242_10152948300829580_3653082796195608977_n result, the boards may be extremely large. It was perfectly normal back for a single plank to be cubic feet long and twenty five inches broad.

As building practices evolved and elegant and newer tools were created, the boards eventually started to get bigger. Builders also started trying out various species of trees such as planks and different finishes.

Around the sixteenth century, both builders and homeowners were utilizing wood flooring to make layout statements. To have stunning wood flooring in your home was seen as a status symbol. Patterned wood flooring really took off with the introduction of parquet from the 1800s.

Throughout the Great Depression, wood flooring lost quite a little of its thunder. The stock market had crashed and nobody wanted to invest the little pieces of cash they had on what they viewed as a luxury item.

Modern Wood Flooring

Wood flooring continued to eliminate popularity during the coming years since at the time it was more labor-intensive to set up. Finally, in the mid-1980s and 90s it made its comeback. Homeowners, builders, and designers began to observe the classic beauty and flexibility of wood flooring and it’s been going strong ever since!

Protecting Your Floors During a Move

6scaawuahq_1755fafe_ce8f_ca17_57cb_7ea3fcd4b0caMoving can be a difficult endeavor. From trying to keep all of your belongings organized to unpacking and acclimating to a new home, moving just isn’t fun- particularly moving from the chilly winter months of New York or moist seasons of the South.

Among many goals throughout a move is not to harm the house your departing and the house you are moving to. Your flooring is the most vulnerable to damage during a movement due to all the traffic it’s receiving. The tips below will help minimize the misuse your floors will require through a move. It is essential to protect your flooring during a move for a lot of reasons.

This blog post will touch on how best to protect your floors during and after a move.

Masonite
Masonite is a hardboard and is sold as 4’x’8′ sheets. This can protect floors by acting as a staircaseLanding1
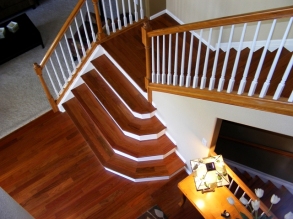
shield if placed right on top of the ground. Placing down these boards at a main walkway and producing a path is the ideal way to protect your floors.

Ram Board is a temporary flooring protectant used during moving and construction to ensure that your flooring is not damaged. It comes in rolls which is typically around 317 square feet(For the builder grade Ram Board.) As it pertains in rolls, it is a lot more compact than the sheets of masonite and may fit in virtually any car or truck. It’s heavy duty and easy to lay as it rolls out and can be cut to size and angle. Much like masonite, you may make a path or walkway to prevent damaging your floors.

Moving Blankets are excellent since they can be wrapped around electronics and furniture to make sure that nothing is damaged and can soften any bump or scrape averting dings and nicks on your furniture, walls and flooring. They’re heavy responsibility but yet soft so your possessions are kept secure. These are definitely a good thing to invest in if going.

Don’t slide boxes and furniture
While it can be tempting to slide boxes and furniture throughout the room- do not. You will scratch or even gouge your flooring. Rather, pick up and set the furniture and boxes in which they belong.

Have a mat to wipe your feet before entering
Although it isn’t sensible to take your shoes on and off during the shifting process, Happy couple with a kid in their new homeputting down mats at entry/exit points will help minimize the external debris which could finally scratch you floors.

Install felt pads all chair and furniture legs. The sensed will protect your flooring from dents and scratching by behaving as a soft barrier between the furniture and flooring. You can carefully slip and move furniture after you have placed the felt pads. Always ensure the felt pads are free and clean of scratch-causing debris.

Take Measurements
It is important to plan and strategize prior to moving. Understanding the widths of furniture and doors will help your move go more easily. And of course it’ll avoid attempting to bring in almost any furniture that won’t fit and potentially scratch and harm walls and flooring.

shutterstock_547024795Hiring a moving company may be the smartest choice you have. During a movement, having multiple assisting hands makes things much easier and faster. For many that do not have those helping hands, a moving company will probably be that for you. Also, moving companies are equipped with all of the things above. Their main objective is to direct you, your family, and your possessions in the exact same manner in which they had been packaged up. They will do whatever they can to prevent damaging any of your articles. Additionally, many moving companies guarantee the liability should anything go awry.

Clean up following the movement
It is a fantastic idea to wash up right following a move. While your home may maintain a discombobulated condition shortly after, giving the flooring a good wipe down is shutterstock_603166082effective in eliminating some of the debris which can scratch or harm them.

Don’t fall or abruptly place furniture, boxes or appliances
By doing so, not only can you risk damaging your contents, but also denting your flooring or cracking your own tile. Carefully place down your furniture, boxes and appliances.

DIY Refinishing


Refinishing hardwood floors is a job best left to the professionals. However, there are a number of homeowners who actually prefer to do things themselves. We’re here to offer some words of caution, as refinishing your hardwood with no professional assistance can have catastrophic results. Here are a couple things you need to look out for should you decide to go it alone.

Keep the Sander Moving

A drum sander is a powerful piece of gear. If you leave it in 1 spot for too long, it can create uneven areas in your floor that will definitely cause some issues. If you are not shutterstock_669694150careful, your refinishing project could become a flooring replacement! If you’re going to attempt and refinish your hardwood by yourself, maintain that shredder moving but watch your speed. Too slow and you risk staying in 1 location for a long time, but if you go to quickly, you can miss spots and your floor will be uneven. If you are at all uncertain, call the pros at Blackheath Floor Sanding and we’ll get it done right!

Beware of Dust

Most belt sanders will vacuum up around 90 percent of the dust they create, but you want to be careful about the remaining 10%, because it is going to become everywhere. Be sure to examine the sanded surface several times to make certain no dust remains. The tiniest pieces of dust may cause flaws in your otherwise flawless, smooth end.

Let it Dry

One of the biggest mistakes useful homeowners make when they do their own refinishing isn’t giving the complete time to dry. Just because it seems dry when you touch it after around an hour doesn’t follow that the flooring is about to be walked.

What is it to have a wood flooring?

0b97b2cfd552e4737f7e2d2752d5713c
An appealing wood flooring options ensured long lasting and made by the highest standards of quality – this is what leads our company to make such satisfactory results. There is a huge options available in our company, because we want our customers to have the most unique wood floorings that exist.
Enormous wood design ideas could be used to create a beautiful finish to your property. We love our job and we are always providing the best services.
Several layering options will enhance the look and appearing from the sample to amazing . Our wooden options, including oak, pine, mahogany and walnut wood come in parquet and panels to be used to enhance your home or office floors.

TOP 10 HARDEST WOODS

TOP 10 HARDEST WOODS

bedroom-1940169_1920.jpg
1. Quebracho – From the Spanish “quebrar hacha,” which literally means
“axe breaker.” Aptly named, wood in the Schinopsis genus is among the
heaviest and hardest in the world.
2. Lignum Vitae -Widely accepted as the hardest wood in the world–this
wood has been listed as an endangered species and is listed in CITES.
Consider Verawood as a very close substitute.
3. Gidgee – This Australian endemic is both very heavy and very strong.
Some pieces are dark enough to be used as an ebony substitute: one that’s
even harder than the original article.
4. Snakewood – It’s easy to see what makes Snakewood so unique–its patterns
and markings resemble the skin of a snake. Limited supply and high demand
make this one of the most expensive woods on eart.
5. Verawood – Sometimes called Argentine Lignum Vitae, this wood is a gem:
inexpensive, great olive-green color, beautiful feathery grain pattern, and
it takes a great natural polish on the lathe.
6. Camelthorn – Formerly classified as a member of the Acacia genus, this
south African hardwood is a tough customer. The wood is stubbornly hard,
and the tree is protected by giant sharp thorns.
7. African Blackwood – In some parts of the world, this wood has achieved
an almost legendary status. Historical evidence points to this wood
(rather than Diospyros spp.) being the original “ebony.”
8. Black Ironwood – Pieces are very seldom seen for sale, as this tree is
too small to produce commercially viable lumber. Like the unrelated
Desert Ironwood, Black Ironwood is an excellent choice for small
turning projects.
9. Katalox / Wamara – Some pieces can be just about a dark as true ebony,
while others are a more reddish brown with black streaks. So much depth
in the Swartzia genus, there’s something for everyone!
10. Cebil- Also known as Curupay or by the exaggerated name Patagonian
Rosewood, Cebil is not a true rosewood. It has a highly variable streaked
appearance not too unlike Goncalo Alves.

SOFTWOODS top 3

SOFTWOODS top 3

dining-table-647008_1920.jpg

PINE: Pine is a softwood which grows in most areas of the Northern Hemisphere. There are more than 100 species worldwide.

Properties: Pine is a soft, white or pale yellow wood which is light weight, straight grained and lacks figure.It resists shrinking and swelling. Knotty pine is often used for decorative effect.
Uses: Pine is often used for country or provincial furniture. Pickled, whitened, painted and oil finishes are often used on this wood.

ASH: There are 16 species of ash which grow in the eastern United States. Of these, the white ash is the largest and most commercially important.

Properties: Ash is a hard, heavy, ring porous hardwood. It has a prominent grain that resembles oak, and a white to light brown colour. Ash can be differentiated from hickory (pecan) which it also resembles, by white dots in the darker summer wood which can be seen with the naked eye. Ash burls have a twisted, interwoven figure.
Uses: Ash is widely used for structural frames and steam bent furniture pieces. It is often less expensive than comparable hardwoods.

HICKORY: There are 15 species of hickory in the eastern United States, eight of which are commercially important.

Properties: Hickory is one of the heaviest and hardest woods available. Pecan is a species of hickory sometimes used in furniture. It has a close grain without much figure.
Uses: Wood from the hickory is used for structural parts, especially where strength and thinness are required. Decorative hickory veneers are also commonly used.

The Blackheath Floor Sanding Company

How it works

10351473_706862769380362_841491283054473940_n

We can give you a estimate over the phone or via email if you have the dimensions, as We work on a rate per sq meter or sq yard the estimate will allow for minor repairs,sanding and finishing with three coats of varnish.
If the price quoted seems reasonable, We will then visit your home to look at the floor and discuss your thoughts, concerns and ideas for the project.
We will then send you a written estimate or email you an estimate for the work.
If you would like to go ahead We will give you a date on which We will hope to start your room. We do not charge for my estimates or advice.

If you have a floor in need of some care and attention, please contact us for a no-obligation quote.

http://www.blackheathfloorsanding.co.uk/

Create a free website or blog at WordPress.com.

Up ↑